Send personal invitation links
Give every guest or family their own link: it fills in their name and lets a family answer together.
Each guest — or each family — has a personal invitation link to your website. It recognises them, fills in their name in the RSVP form, and lets the family answer together. There is also one common link for everyone.
Step by step
Step 1Open the invitation links
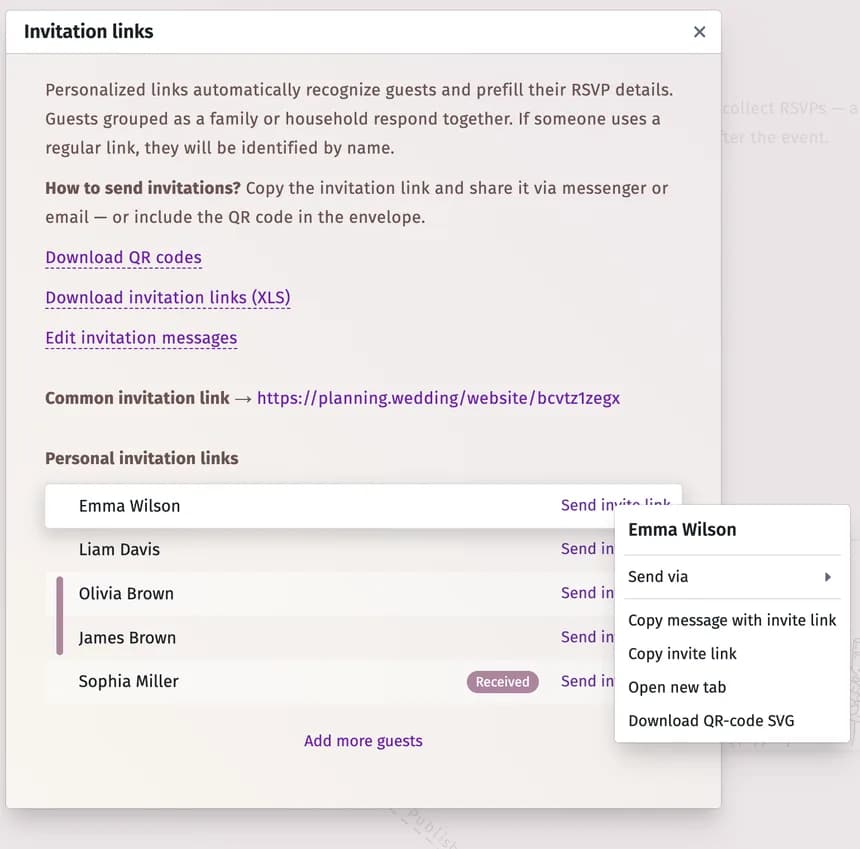
Open Website and click Invitation links. You see the Common invitation link and the Personal invitation links — one row per guest; a coloured bar joins the members of a family.
Step 2Send a guest their link
Click Send invite link next to the guest:
- Send via — open WhatsApp, Telegram, Viber, Gmail, your e-mail app or SMS with the message ready.
- Copy message with invite link — the invitation text with the link, to paste anywhere.
- Copy invite link — just the link.
- Open new tab — see the website as this guest will.
- Download QR-code SVG — this guest’s QR code for a printed invitation.
Step 3Prepare everything at once (optional)
- Download QR codes — the QR codes of all personal links and the common one, ready to print.
- Download invitation links (XLS) — every guest with their link in one spreadsheet.
- Edit invitation messages — change the wording of the invitation message (for a man, a woman and a family; the guest’s name is filled in).
Step 4See who has answered
Once a guest has replied, Received appears next to their name.
Tips and important notes
- If a guest’s e-mail address or phone number is in their comment or in a field of your own, sending via e-mail or SMS uses it.
- Want only invited guests to see the form? Switch on Display RSVP form for website visitors who came only by individual invitation links. in the RSVP block’s settings — see Set up your RSVP form.
- Invitation links and QR codes are free.
Troubleshooting
- Two people who live together got separate links.
- Put them in the same family (Family in the guest’s profile) — they then share one link and answer together.
Updated November 3, 2026